Times are changing and for the foreseeable future conference events will not be able to run the way they used to. Fortunately there are a host of different options available to ensure your conference can still go ahead, virtually.
Shifting your conference online can be a daunting task but, it is much easier than you think. In our simple guide we have checkmarked all the points you need to cover in order for your event to be a success!
Decide when and where to host your conference
When scheduling your conference date it is important to allow yourself enough time to get everything organised. Below are a few things you will need to consider:
- Allowing sufficient time for yourself and other hosts to become familiar with your conferencing tool.
- What subjects are you going to talk about? Who will be your speakers and vendors? Will your conference have a theme?
- Will you have a presenter at your conference to welcome attendees and introduce speakers? If so it is a good idea that this person is someone separate to the organiser to allow them to solely focus on presenting and providing the best experience to your attendees.
- Who will attend your conference and how will they hear about it?
We would recommend allowing a minimum of 2 months between when you start planning your conference to the date of the event. It is best to plan and schedule as much as your conference as possible before creating your event online.
Software companies are moving and adapting quickly in order to be able to cater to the current market, we are going to show you one of our favourite conference tools.
Hopin
(hopin.to)
What is it?
Hopin is an all-in-one live online events platform allowing attendees to learn, interact and connect with people from anywhere in the world. It includes a main stage for your speakers, virtual booths for exhibitors, breakout capability for targeted sessions, alongside a networking option to allow your attendees to meet one another. You can choose which of the above you would like allowing you to personalise the event to your requirements.
How much does it cost?
- Hopin costs $99 per month per organiser, this includes:
- 100 attendee registrations per month per organiser (50p per registration once your monthly allowance has been used up)
- Full access to the Hopin event platform including networking, sessions, stage, expos, registration page, chat, analytics and more.
- Up to 10,000 participants
- Ticket can be claimed/purchased directly from Hopin saving potentially hours of administration work
How to get started
Firstly, go to https://hopin.to
Click ‘sign up’ in the top right hand corner
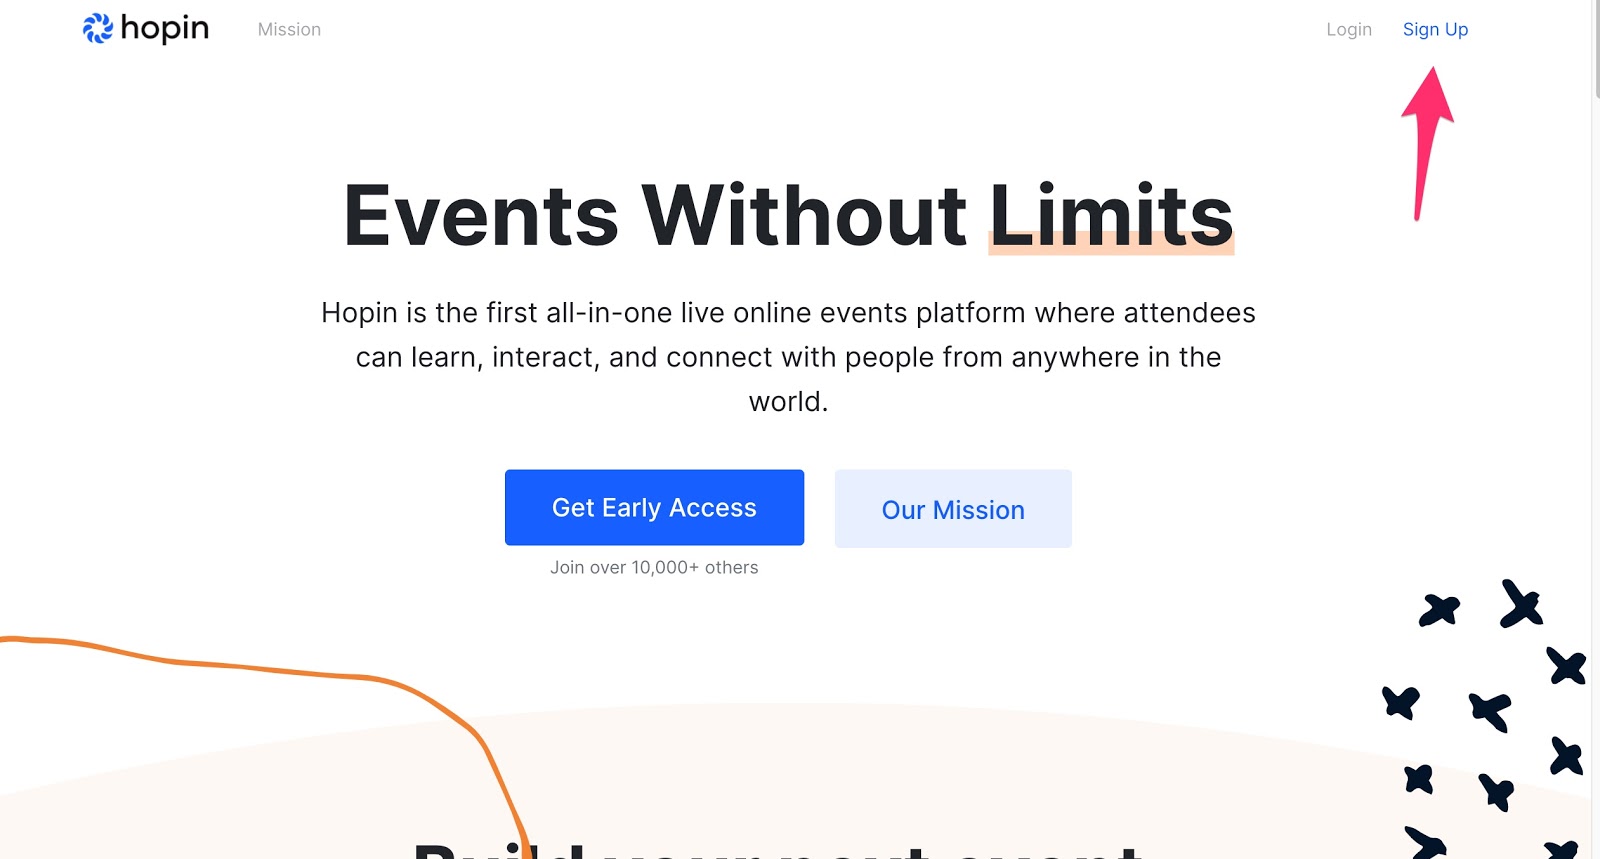
You can then create an account by completing your details, alternatively, you can use an existing Facebook, Linkedin or Google account.
You can create your account free initially to get your conference set up, once you are ready to start promoting and for attendees to claim their tickets you can set up the payment under the ‘billing’ tab of ‘my account’.
Once you have created your account you can then begin building your event! To get started select ‘My Account’ which will take you to your Hopin dashboard. Firstly you need to add your organisation’s details, you can do so by selecting ‘New Organisation’ on the left hand menu. Here you can see I have added Scribe as my organisation.
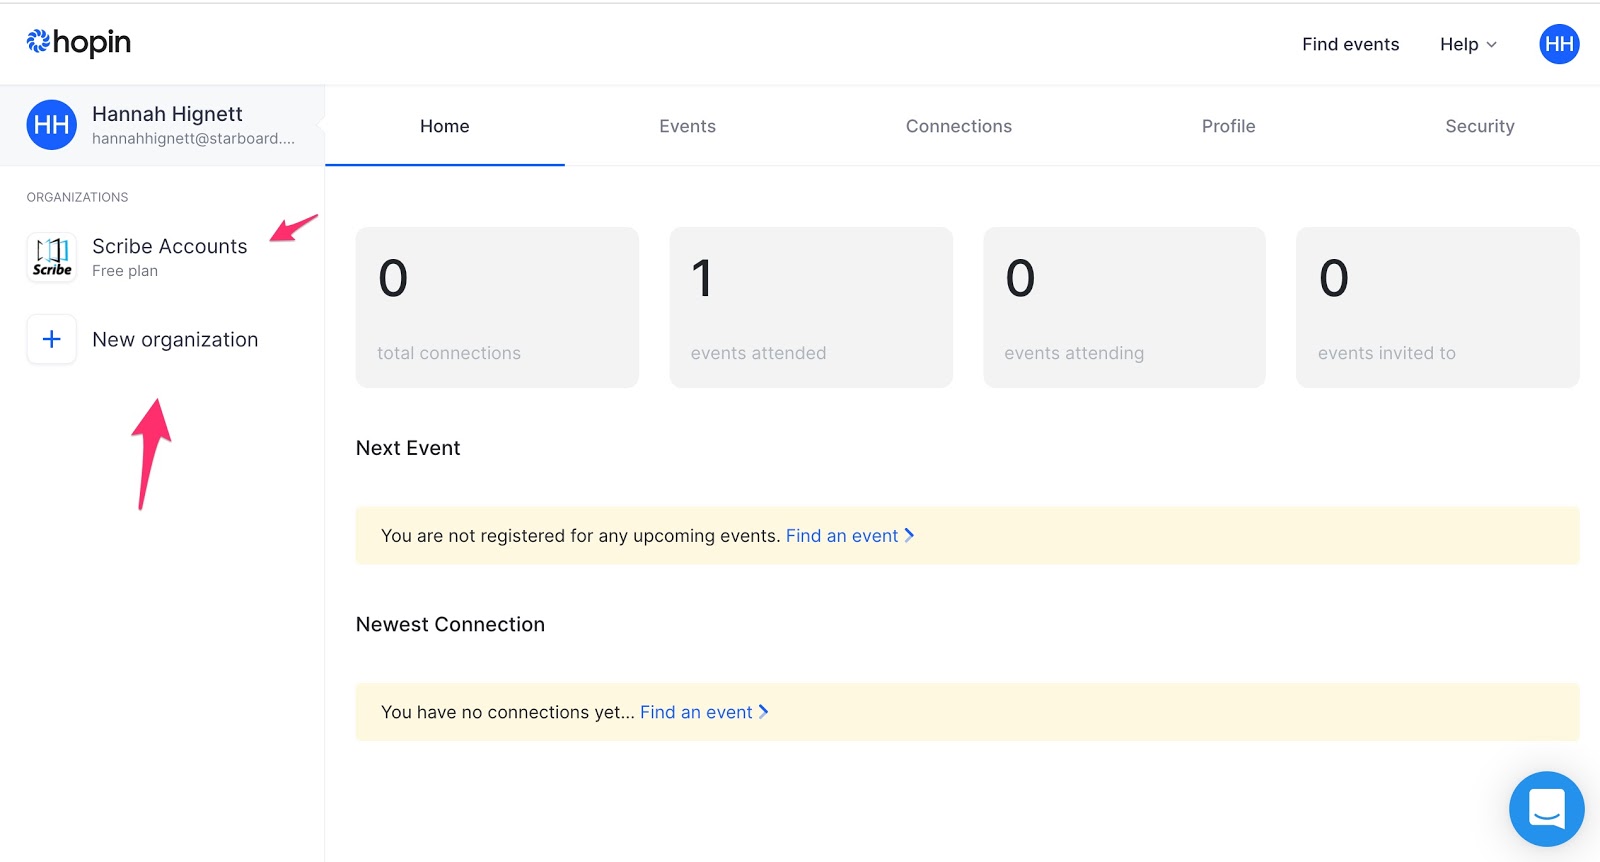
Once you have added your organisation you are ready to get started creating your event!
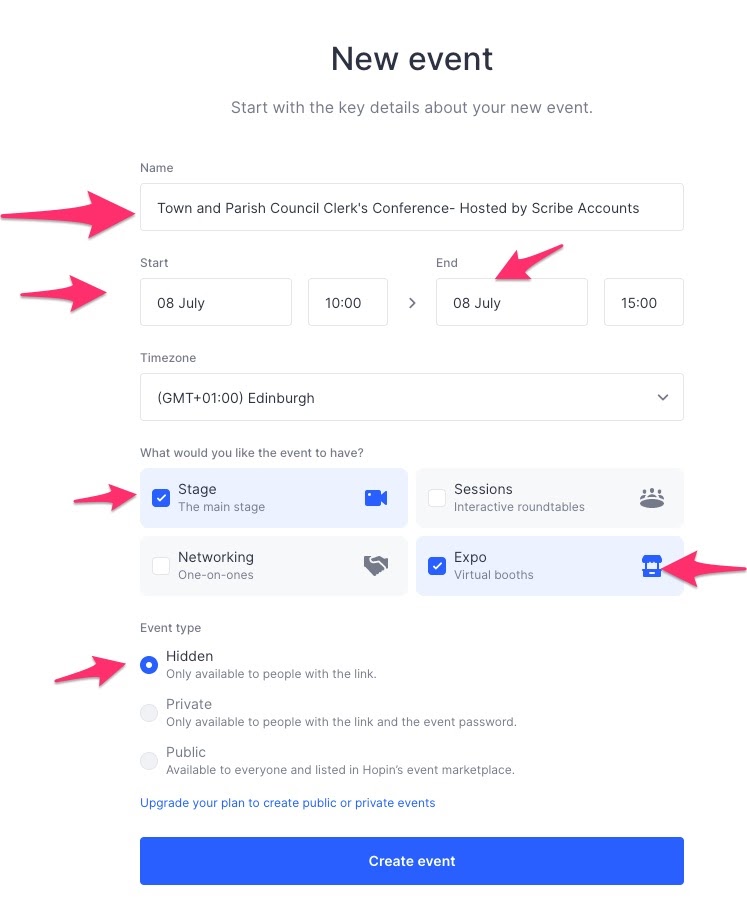
Select ‘Create Event’ from your dashboard. Here you can name your event, set the start date and end date, also you can choose which type of event you would like to be available during your conference. Our conference is going to include a stage for our speakers and an expo to allow vendors to exhibit. We recommend keeping the event as ‘hidden’ as this will ensure that only the people you want to attend will be there!
Once your event is created it will take you to your dashboard. This is where the fun starts and we can get stuck into organising! On the left hand side are all the different menu options which we will be using to set up our event. You also view your registration page by clicking the button as shown in the screenshot, here is where you can also find the registration link to send to your attendees.

Menu options
Key Details
This is where you can view the scheduled event and edit the name, time, if needed. You can also change the currency of your conference (if you are charging for tickets).
Tickets
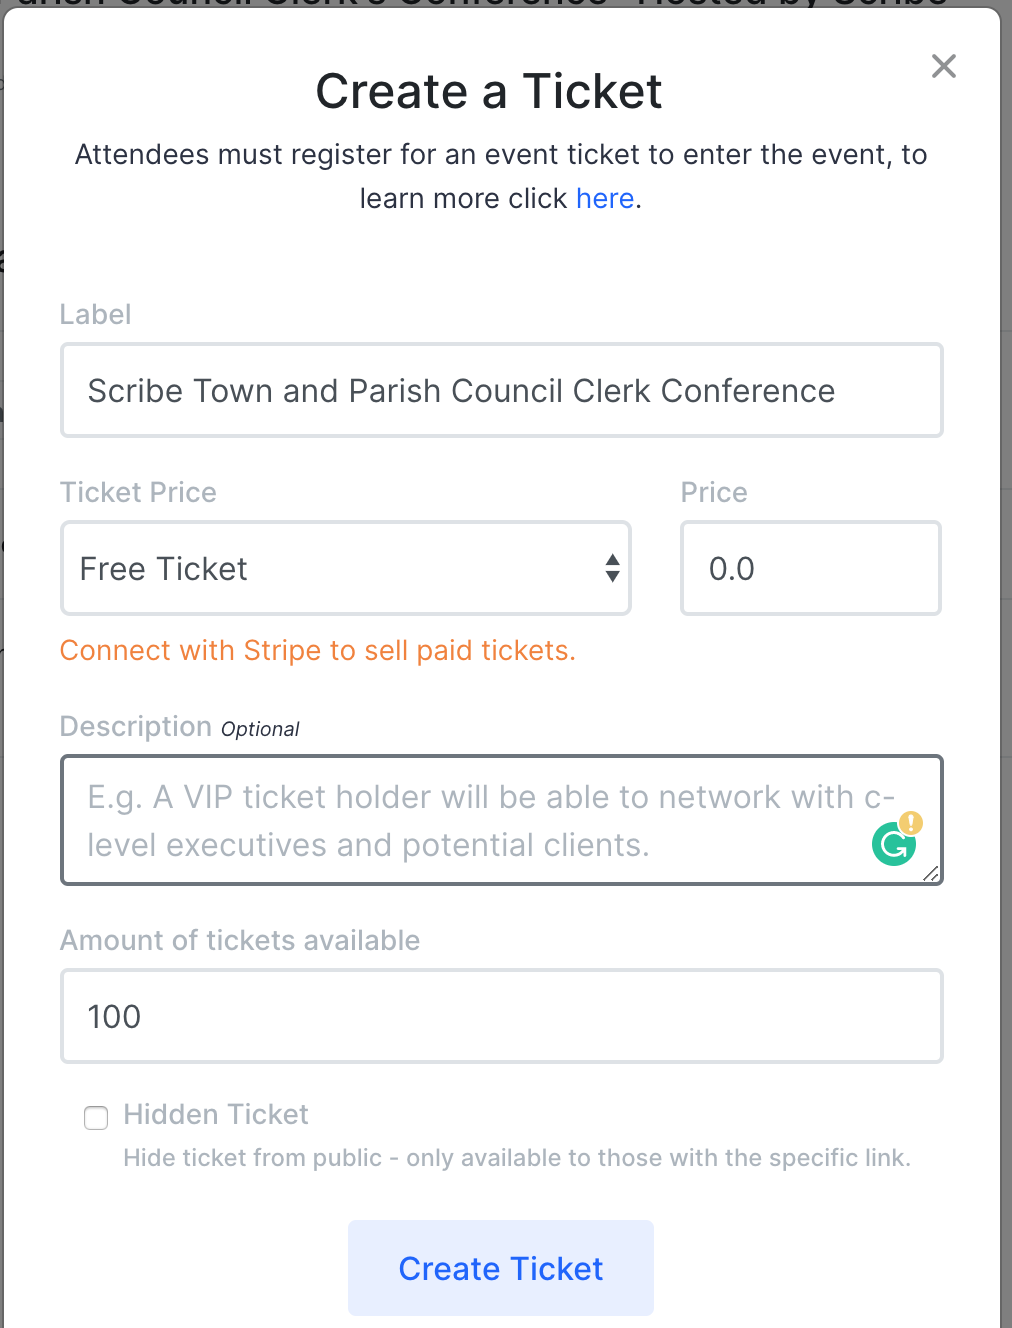
This menu item is one of the most important features of Hopin. Here is where you can create your event tickets. First off select ‘create ticket’ you can then give your ticket a name, select whether they are free or at a charge, you can then add a description and allocate the amount of tickets available. Once you have created your tickets you can publish your event.
*Top-Tip*
if you are charging for your tickets is to allocate the first 50 tickets at a discounted rate, this will incentivise your attendees to sign up quickly. To do this you would need to create two different sets of tickets, the first set of tickets at a cheaper price with a different name (for example: “Early Bird Tickets- Only 50 Available”) and a second set at the full price. Once the discounted tickets have been purchased it will show only the full price tickets available.
Whilst creating your event tickets it is a good idea to create a number of ‘hidden’ tickets which you can send to your event speakers, vendors and staff to be able to register for the event. Your hidden tickets will only be available to people with the unique link.

Once you have created your ticket it will show under the Ticket menu option. You have the option to embed your tickets onto your website if you wish which will allow attendees to sign up directly from your page.
Registration
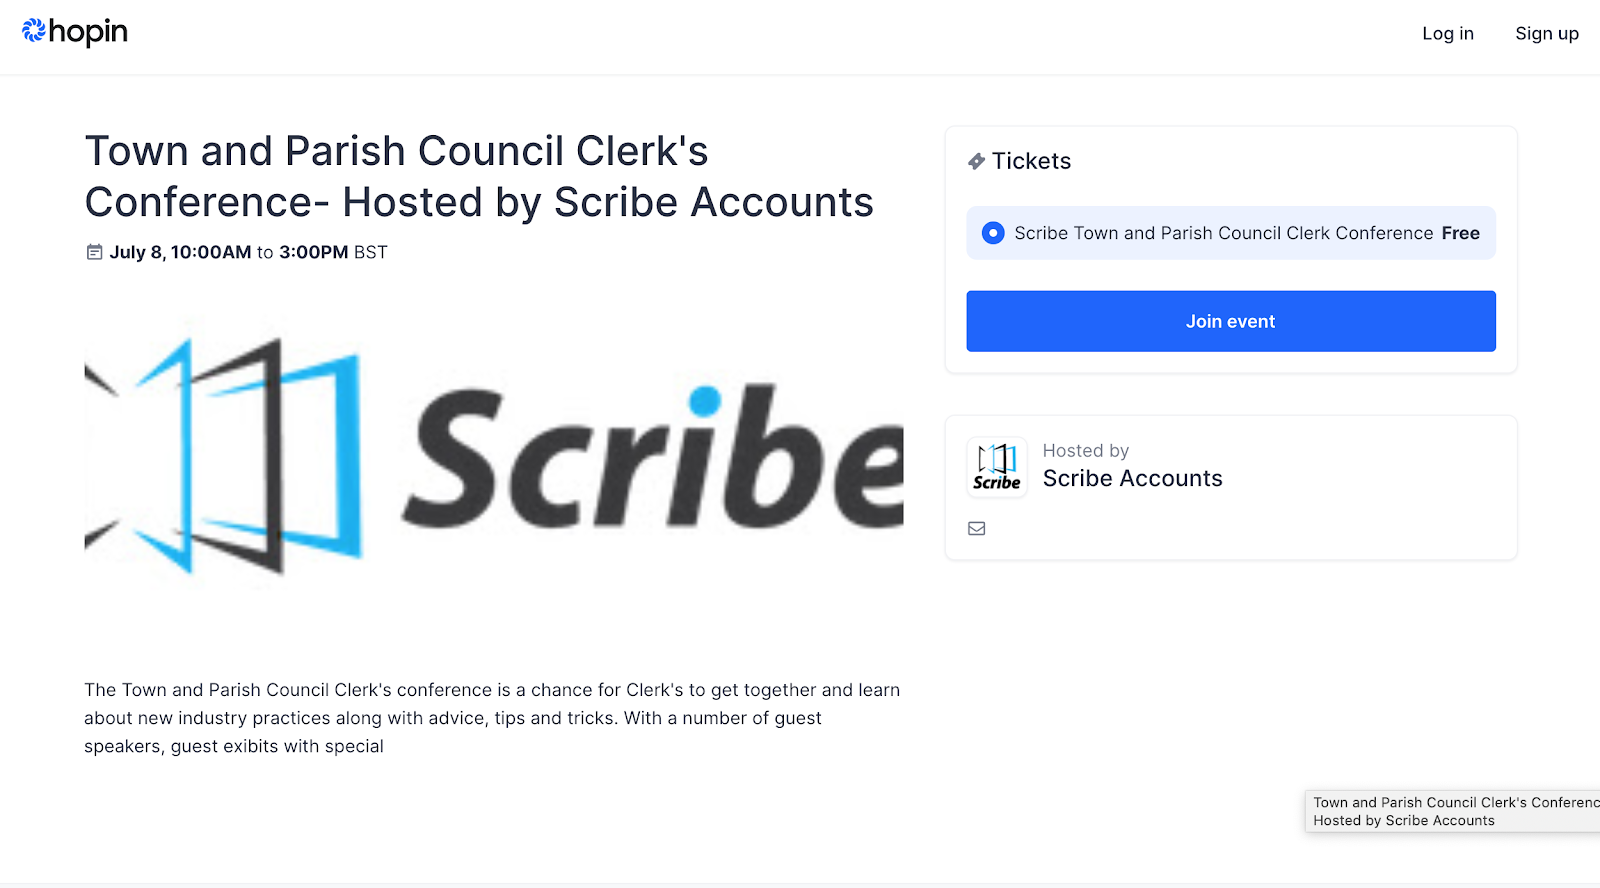
Within this page we can customise our ticket registration page to make sure it is personalised to our conference. You can add an image such as your logo, you can also add a short description about what your attendees can expect to see and learn at your event. Once you have added a description and an image of your choice you can preview how the ticket screen looks by going back to ‘tickets’ and clicking ‘view tickets page’. Here is what my registration page will look like:
Reception
Within this menu option we can add a welcome message for when attendees first join our event. This is a great way to include a bit of background information about the conference and tips and tricks on how to Hopin to ensure they have the best experience.
Stage
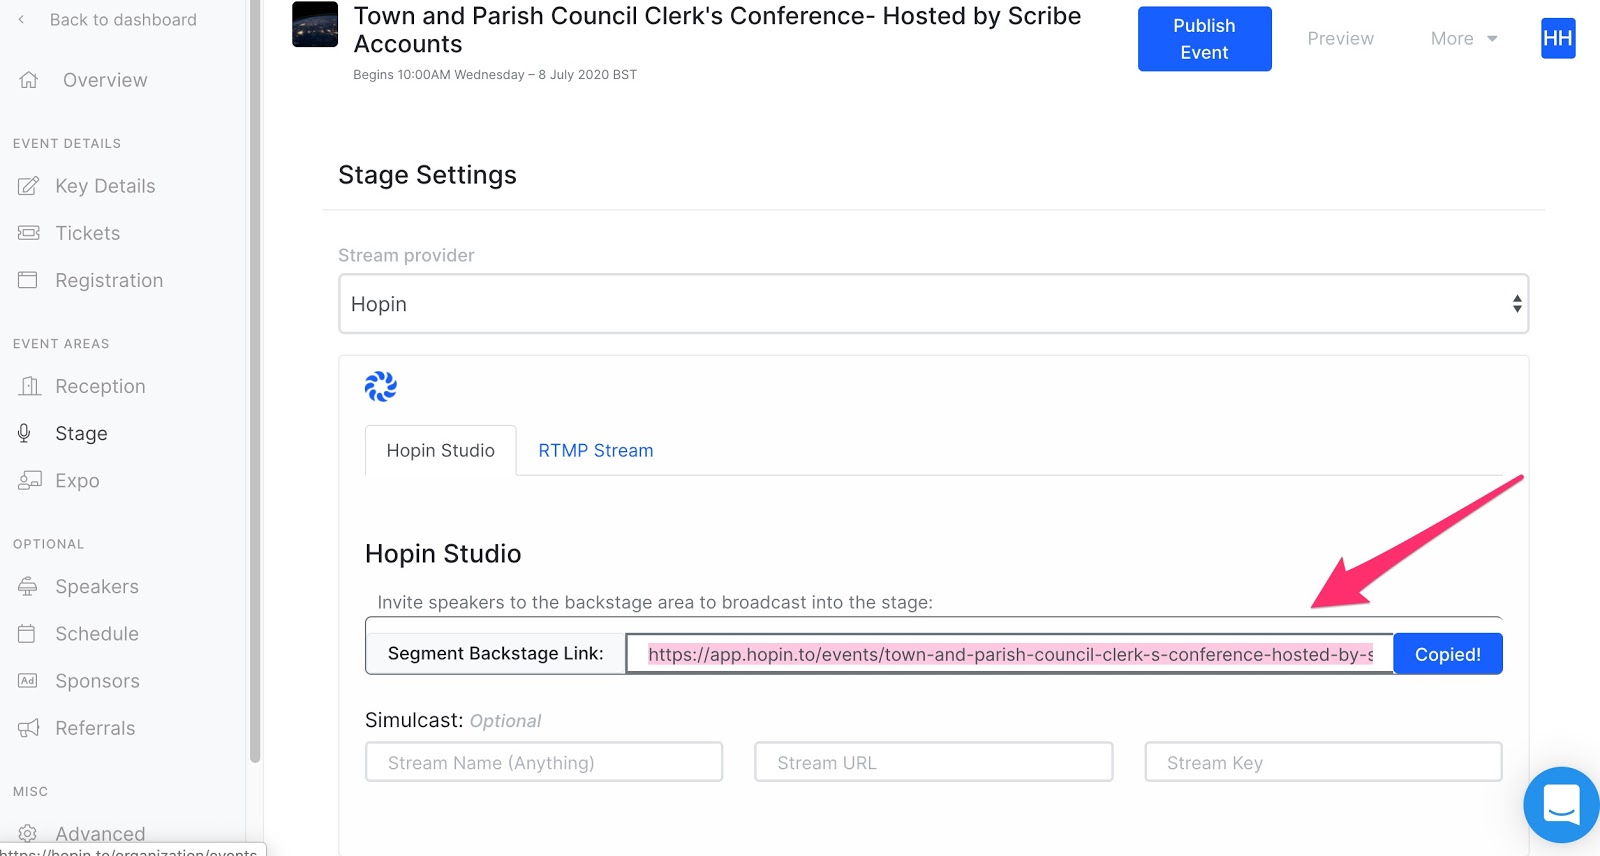
Within the stage menu option you can see the link you and your speakers will need in order to speak and present at your conference. We will cover more of how speakers can present later on in this post.
Expo
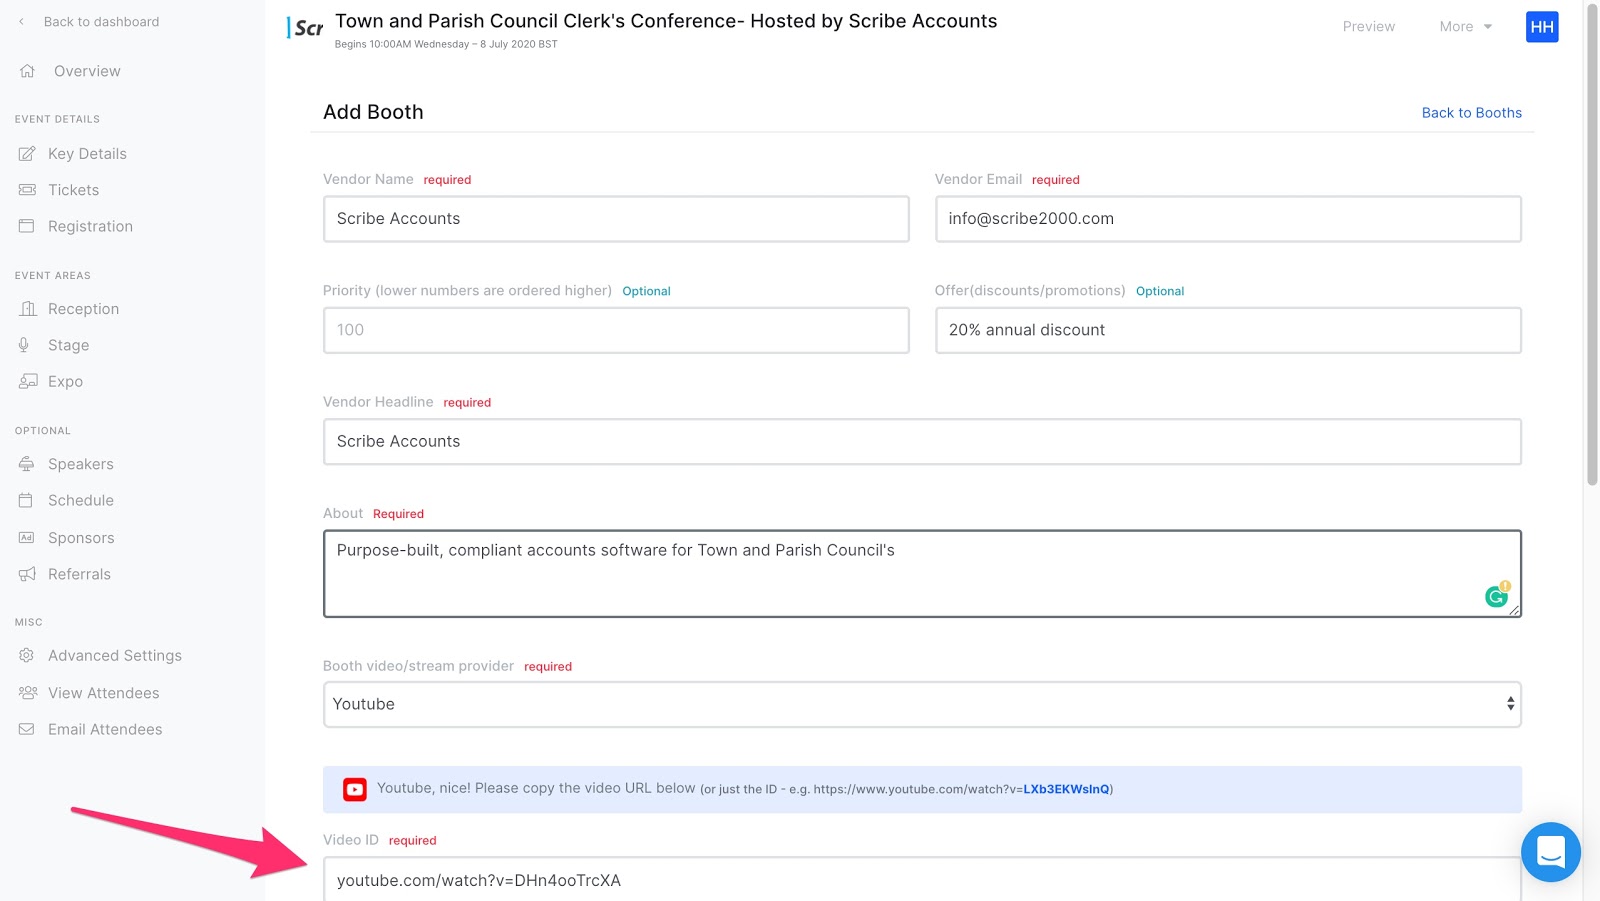
Next up we are going to show you how to add vendors to your conference, if you head to ‘expo’ on the menu and select ‘add booth’.
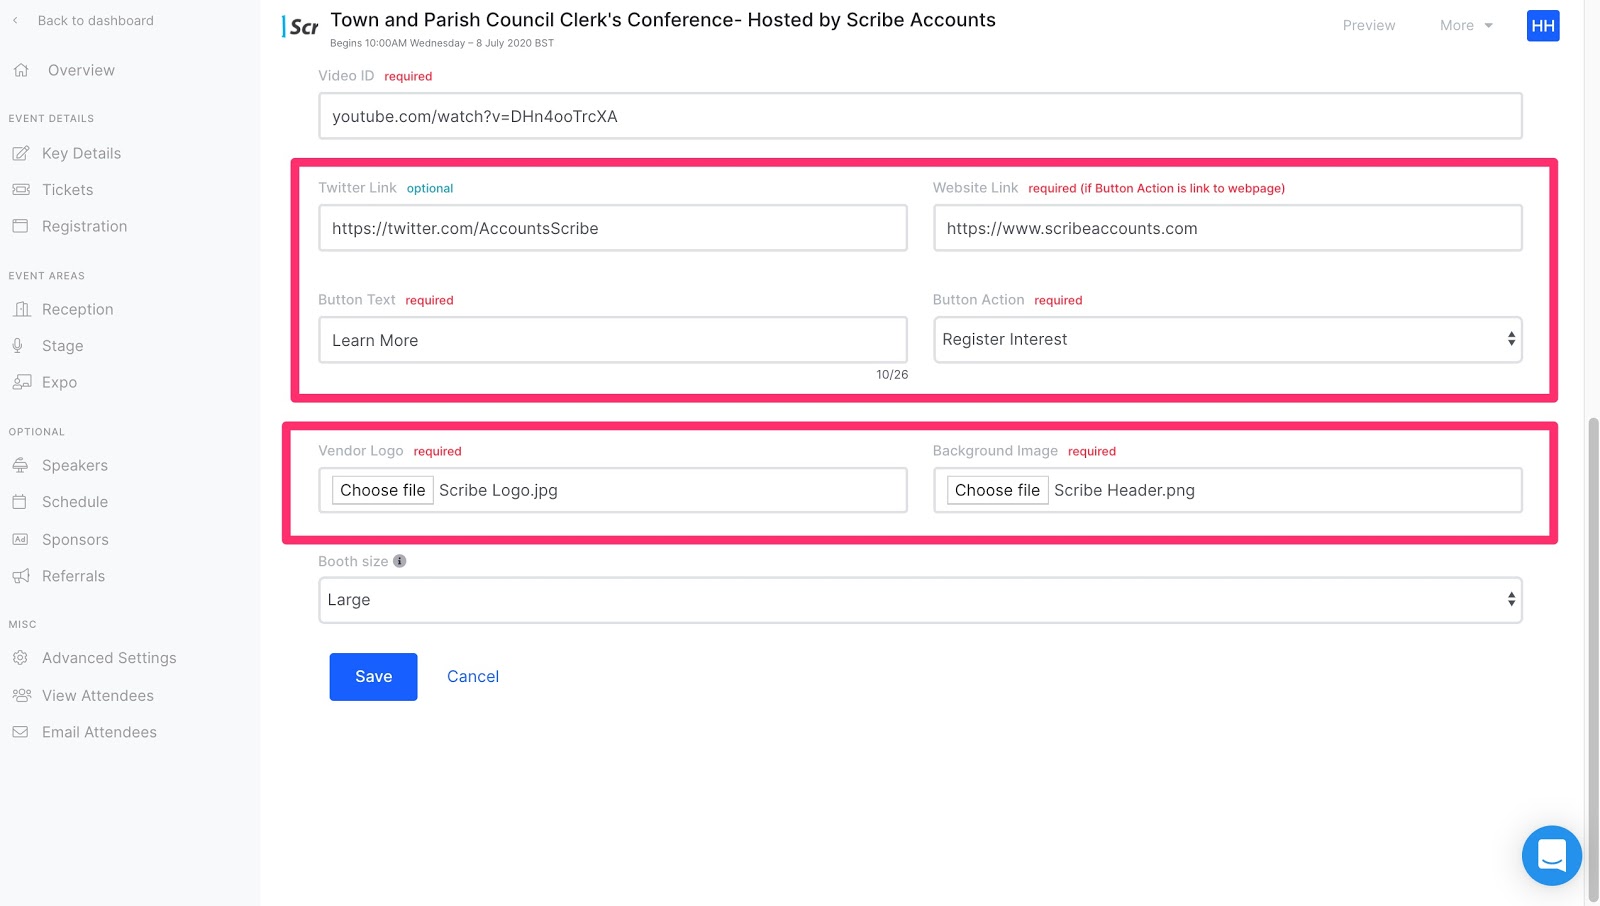
Firstly we can fill in some information about our vendors including a description of what they do, a special offer for attendees of your conference, their logo and a background image of their choice along with social media and website details for attendees who wish to learn more.
You can ask your vendors how they wish to present their product, they can either add a link to a Youtube video and speak to attendees via the live chat, alternatively they can be live themselves and attendees can join with video and audio to chat. If your vendors would like to be live you will need to select ‘session’ when setting up their booth and select the moderator for the booth, they will then be able to control who can go live within their booth. (To add a moderator for a booth you will need to ensure the person is already registered for your event).
Within the setup you can also include their logo and a background image of their choice along with social media and website details for attendees who wish to learn more.
Attendees will be able to register their interest with your vendors directly through Hopin, you can either choose for attendees to be taken directly to their website, alternatively they can register interest and their email address will be sent directly to your vendor who can then send some more information to them.
Speakers
Surely one of the most important parts of a conference is the speakers?
Hopin makes it really simple to add your speakers directly into the conference. Firstly speakers need to be registered for the event, they can do this on the ‘registration’ page of Hopin the same way your attendees register.
Once they are registered you can allocate them as speakers, to do so head to the ‘Speakers’ menu option and select ‘add speaker’ you can then simply type their name into the ‘select speaker’ box and you can also include a quick description in the ‘headline’ box.
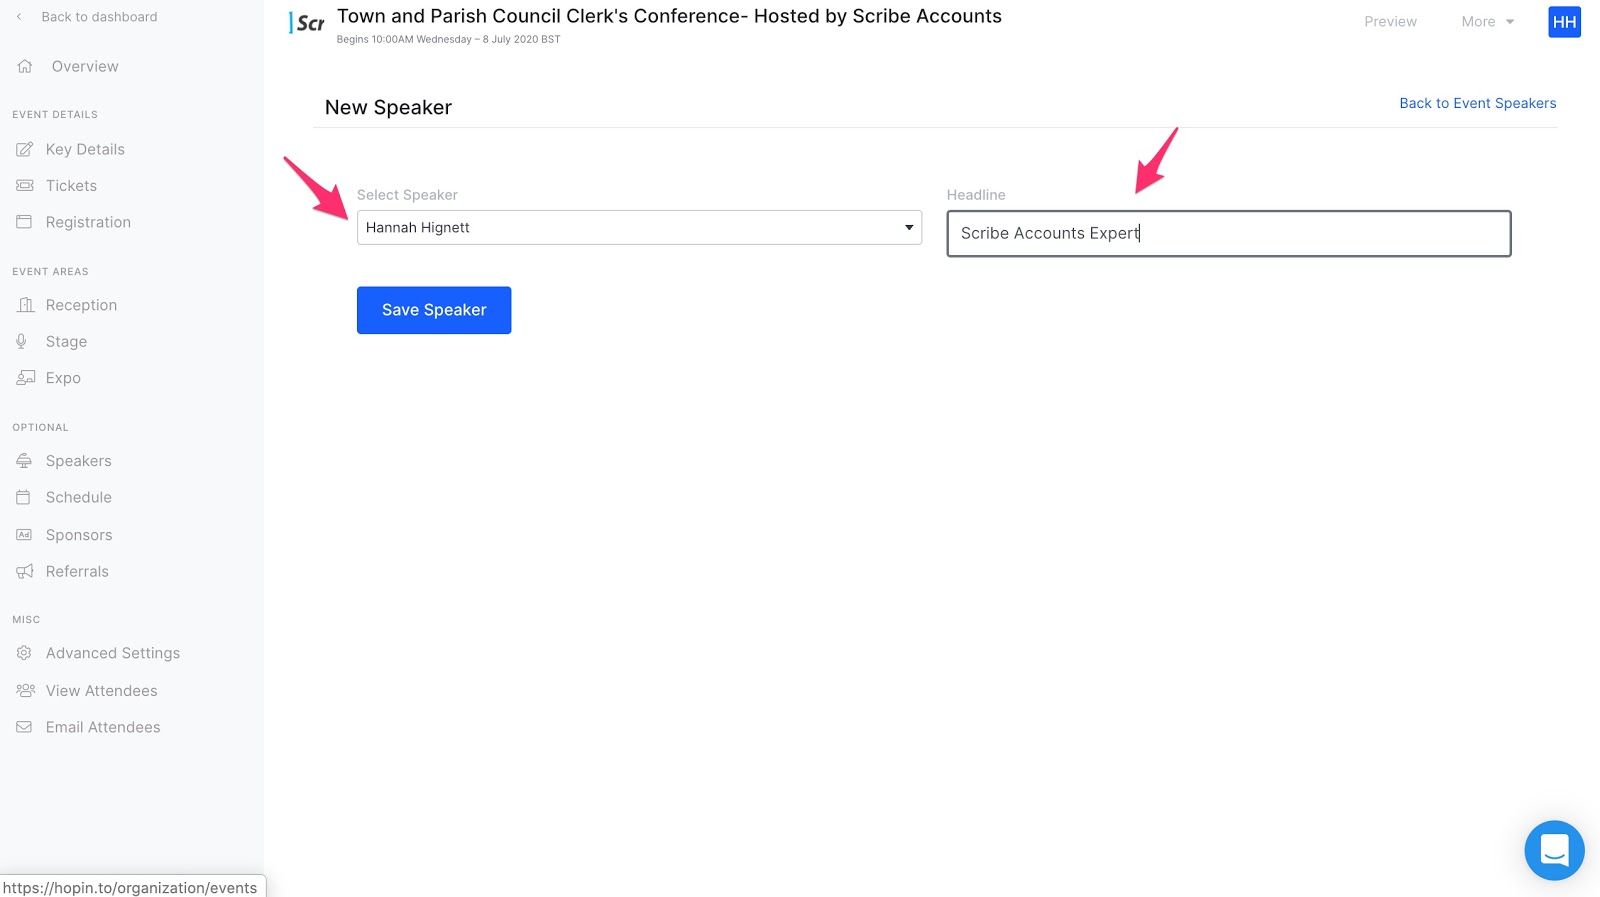
You can add as many speakers as you wish, once they are added you can view all of these under the ‘speakers’ menu option. If you head back to ‘overview’ you can see the unique link which you will need to send to your speakers in order for them to access the backstage.
Schedule
“Take care of the minutes and the hours will take care of themselves”
Both attendees, speakers and exhibitors will like to know what is happening when, this will ensure your event runs smoothly! Luckily Hopin has a built in schedule planner to ensure everything is perfectly organised.
*Top-tip*
We recommend scheduling a 10 minute break between each presentation to give your attendees time to grab a drink etc and to also allow for any run-over of your presentations.
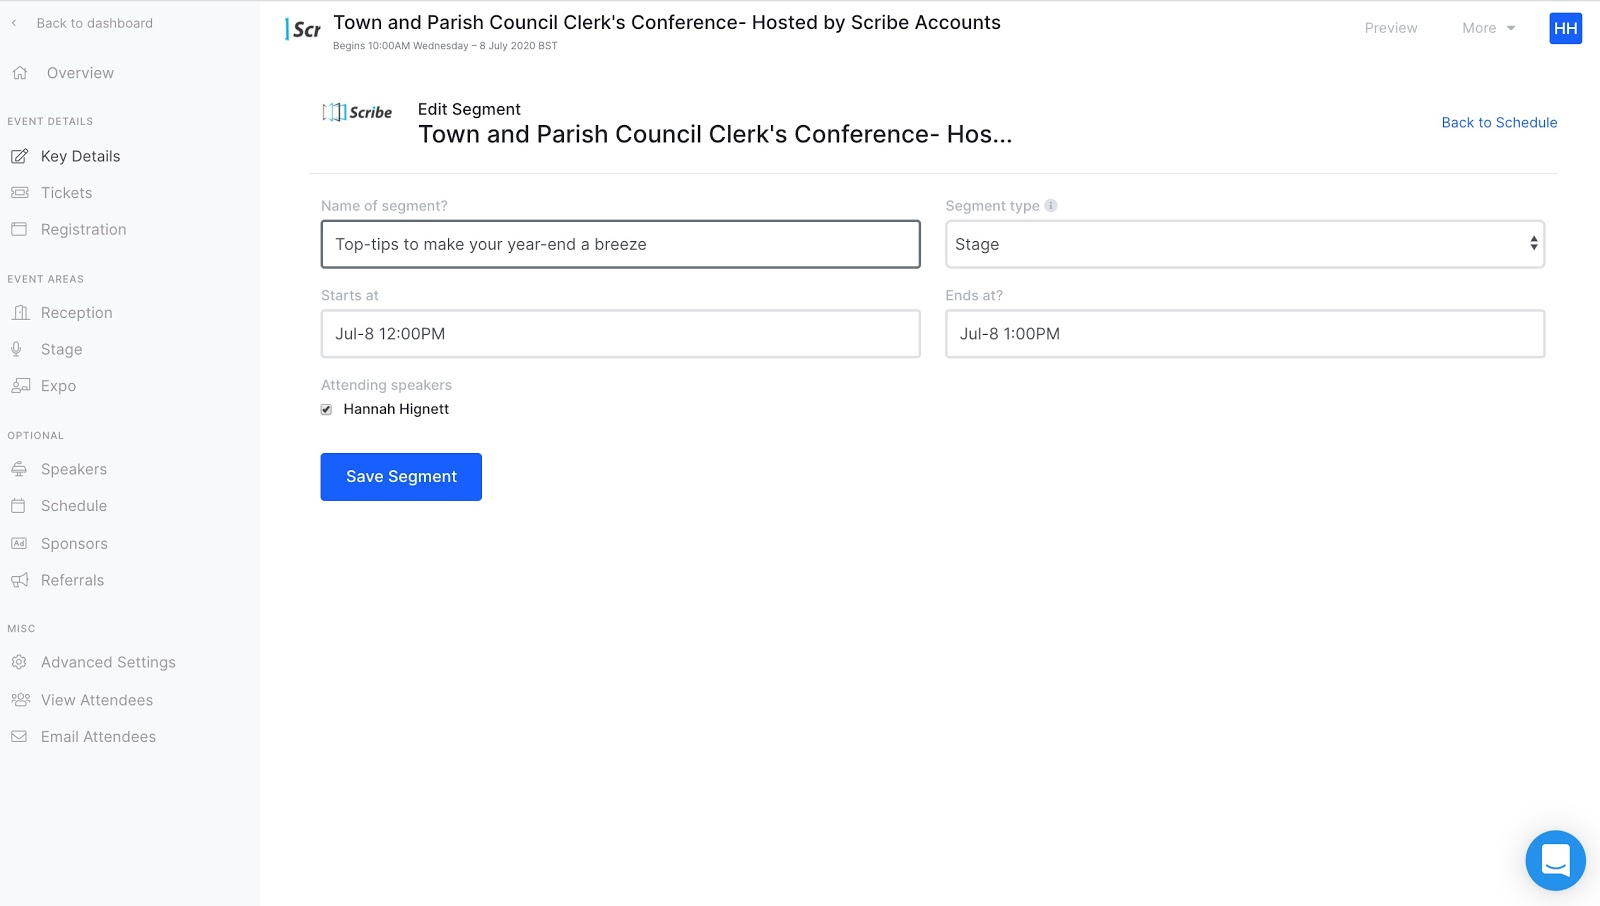
Once you have followed the above step and added your speakers you can then schedule the timings. To do so head to ‘schedule’ in the left hand menu, and then click “Add to Schedule”.
You can then give your item a name, choose the segment type (generally we always use stage), select the start time and end time and choose your speaker and then click ‘save segment’. This will then be added to your event schedule and show on the registration and event homepage.
Sponsors
If your event is being sponsored by other businesses you can add their details under the ‘sponsors’ page. You can see their logo and website and they will show up on your event home page.
What next?
Now that you have set up your event it is important to carefully check through your schedule, speakers, timings and make sure everything is correct. It is also a good idea to double check your registration page as this will show the event schedule, the available booths, the sponsors and the speakers. Here is what my registration page now looks like with the information added.
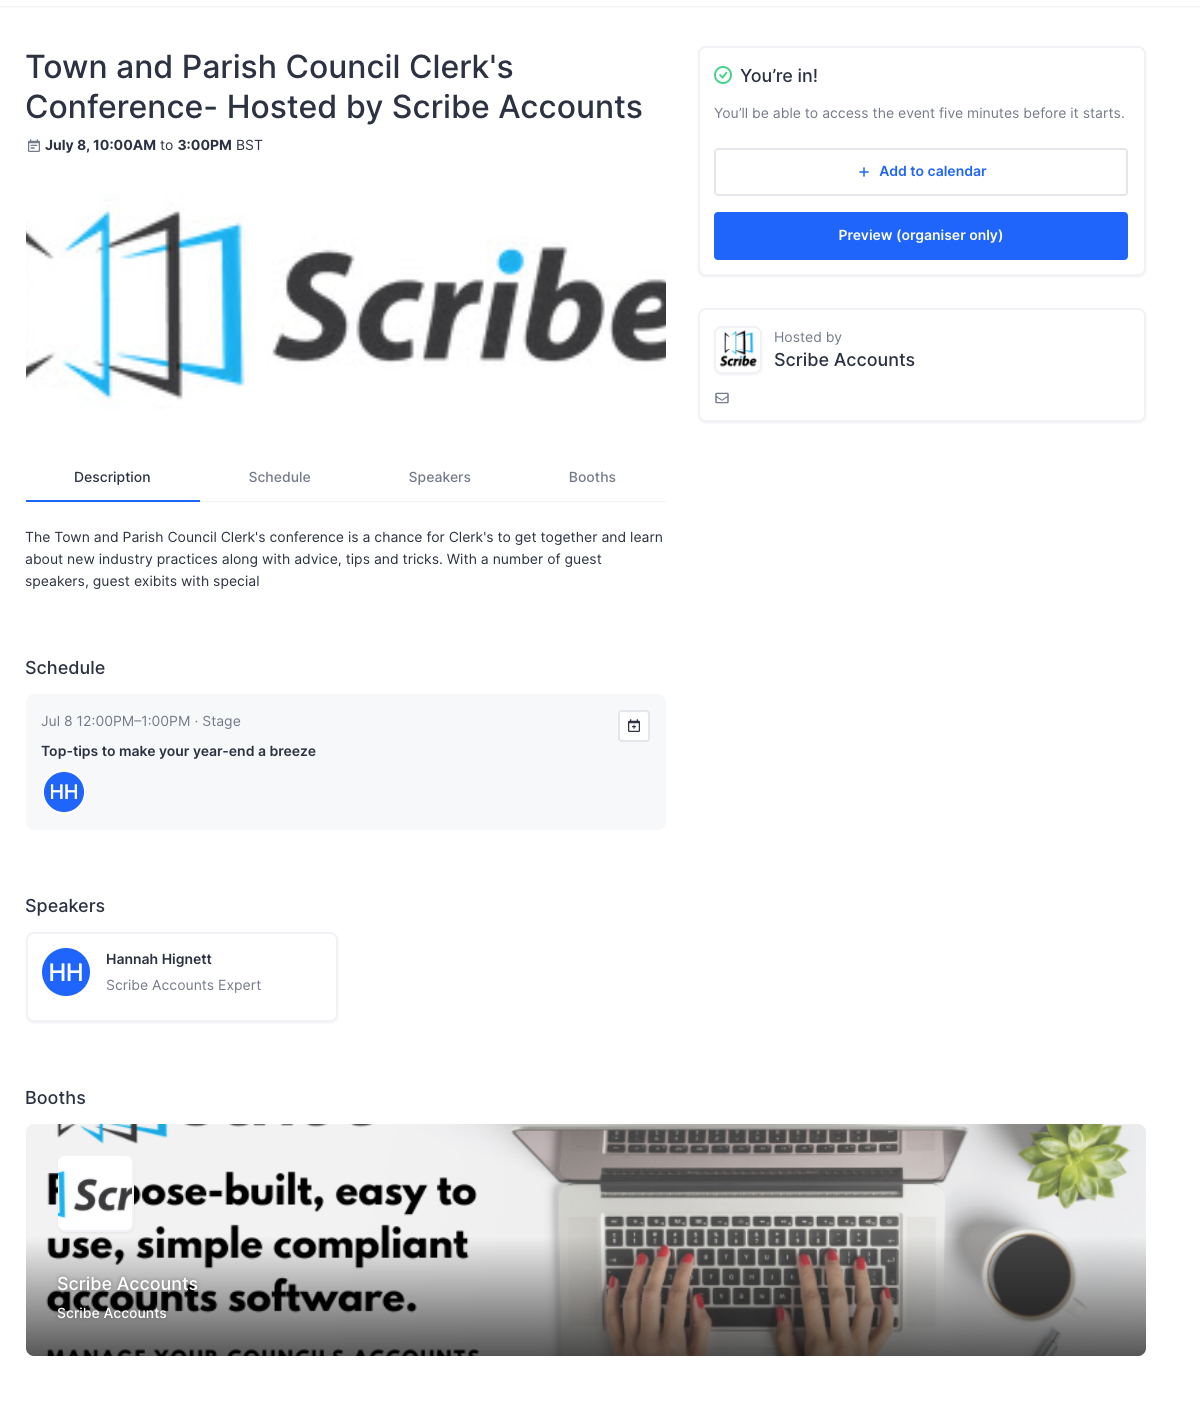
Once you are happy that everything has been set up correctly you can start promoting your event! If you have a database you could email all potential attendees with the registration link, you could also share via your social media pages. Spread the word about your conference and even share some snippets of what they could learn if they attend.
*Top-Tip*
Ask your sponsors, vendors and speakers to share within their network too.
Attendees will receive an email reminder automatically from Hopin 24 hours and 1 hour before your event begins.
Test, test, test!
It is a good idea to have a test run with your speakers to ensure they are comfortable with how Hopin works, you can have a practice session a few days before your conference, this will minimise any delays on the day and make sure your attendees have the best experience possible!
On the day
So, the big day has arrived!
Your Hopin event will automatically open 5 minutes before the start time, attendees can join through the registration page link.
How to join backstage as the organiser and for your speakers.
First things first you need to join the backstage of your event, this is where your speakers will join and can speak to one another before going live in your event.
You can find the link to your backstage by logging in to your account and selecting ‘stage’ from the menu, you can then copy and paste the link in a different window.
*Top-Tip*
We would recommend having two tabs open on the day, one as an attendee to your event, and the other for the backstage.
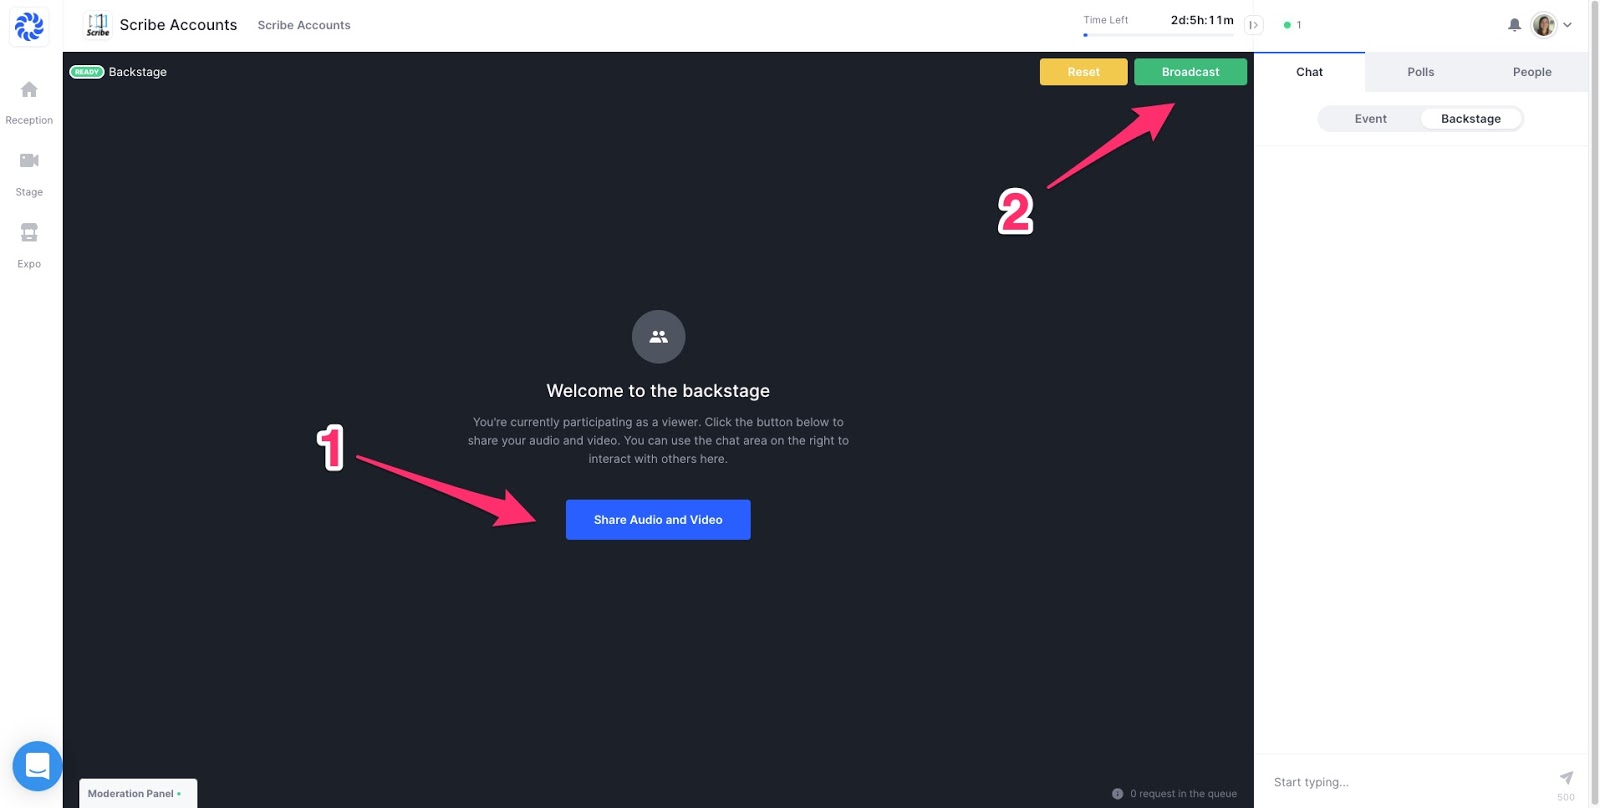
Once the page loads you will firstly need to allow ‘Share Audio and Video’. It will bring up a test screen and you can make sure everything is working as it should be. When you are ready you can simply press ‘Broadcast’ at the top right hand of the screen and you will live! You can use the backstage chat on the right-hand side to communicate with one another (don’t worry, your attendees won’t see this chat!)
You can control who visits the backstage from here and make sure the right speakers are on stage at the right time. All the speakers will need to do the same. We recommend your speakers joining backstage around 15-20 minutes before their presentation. When it’s their time to present they can do so by clicking ‘request to participate’.
Speakers can share their screen whilst broadcasting, once they have joined they can click the ‘screenshare’ button at the bottom of their video.
How to join the conference as a vendor
If your vendors are using Youtube on their booth they can simply login to the event as an attendee, go to their booth and speak to visitors using the live chat. If they are joining via session (live video) the moderator will need to go to ‘expo’ and click the blue ‘start session’ button. They will need to allow Hopin to use their camera and microphone and then press ‘join session’ to go live!
How attendees will see your conference
Attendees can navigate your conference by using the menu on the left hand side. They can also interact with vendors, speakers and other attendees by using the chat on the right hand side. Here you can also see the names of the people attending your event and you can see how many are watching live at the top right hand corner (next to the green button)
*Top-Tip*
Vendors can use the live chat on the right hand side to invite members to their booth.
At the end of your event it will automatically finish at the set time. If you head to the ‘overview’ in your dashboard you can see some data on the number of people who attended and the pages they visited.
And that’s it, GOOD LUCK with your event, we hope this guide has been super helpful in getting your started with your next online conference, if you have any further questions don’t hesitate to drop me an email: hannah.hignett@scribeaccounts.com


